Managing image files
Category image files
You can manage image files using categories such as Business or Personal. You can also create personalized categories.
| 1 |
Tap
The check boxes used for selecting the image files appear. in the image file list screen. in the image file list screen. |
|---|---|
| 2 | Tap the check boxes to select the image file(s) you want to categorize. |
| 3 |
Tap Categorize button at the bottom of the screen.
The confirmation dialog box appears. |
| 4 |
Tap the arrow |
| 5 |
Tap OK.
|
Creating personalized categories
| 1 |
On the photo list screen, tap
The Edit Categories screen is displayed. |
|---|---|
| 2 | Tap New, and enter a name for the new category. |
To delete category
Select the category you want to delete in the Edit Categories screen, and tap Delete.
Attaching comments to image files
You can attach comments to PGP format image files stored on your CLIÉ handheld.
| 1 |
In the photo list screen, tap the image that you want to enter a comment.
The selected image appears on the Full Screen mode. |
|---|---|
| 2 |
Tap
The Details screen is displayed. . .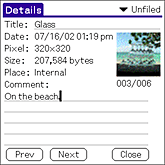
|
| 3 |
Enter your comment in the Comment field.
Tap Close. |
Note
You cannot attach comments to image files stored on a “Memory Stick” media.
Deleting image files
Deleting a picture
| 1 |
Tap
 . .The confirmation dialog box is displayed. 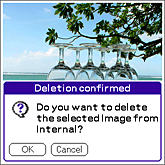
|
|---|---|
| 2 |
Tap OK.
To return to the screen, tap Cancel. |
Deleting multiple pictures
| 1 |
Tap
in the image file list screen and then tap the check boxes to select the image file(s) you want to delete.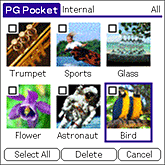 |
|---|---|
| 2 | Select the check boxes of the images to be deleted. |
| 3 |
Tap Delete.
Deletion confirmed dialog box appears.
|
| 4 |
Tap OK.
The image deleted, and then next image appears.To return to the screen, Tap Cancel. |
Beaming image files
You can beam still image to other Palm OS based devices via the IR port.
| 1 |
Check whether the IR ports of the sending side and receiving side are positioned properly so that communication is possible between them.
For details, see Handbook manual. |
|---|---|
| 2 |
Place both CLIÉ handheld units so that their IR ports are facing each other.
The distance between them should be 4-8inches (10-20cm). |
| 3 | Start the PictureGear Pocket application of the sending side CLIÉ handheld. |
| 4 | Display the image file that you want to beam. |
| 5 |
Tap
 . . |
| 6 |
Tap Image, and then tap Beam.
Do not move the CLIÉ handheld units until the image is transferred.
After beaming the image, the sending side CLIÉ handheld returns to the state before the sending operation.
The receiving side CLIÉ handheld displays the received image in Full Screen mode.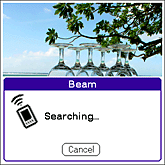
|
Notes
| • | You can beam PGP format image files stored on you CLIÉ handheld or the inserted “Memory Stick” media to another Palm OS PDA. (You cannot beam DCF format image files.) |
|---|---|
| • | You can only beam one image file at a time. |
| • | Do not beam a 16-bit-image file to a CLIÉ handheld with PictureGear Pocket Ver.1.x installed, as it is not compatible with 16-bit image files. If you do, the screen of the receiving handheld goes blank; in such cases, tap the screen to recover to the state before beaming. |
Saving the image files taken by a digital still camera to your CLIÉ handheld
You can save the image files taken by a digital still camera in a media to your CLIÉ handheld. The DCF format image changes to the PGP format.
| 1 |
Insert the “Memory Stick” media that stored the image file(s) taken by a digital still camera into the Memroy Stick slot.
|
|---|---|
| 2 |
Start the PictureGear Pocket application, then tap the arrow
|
| 3 |
Select the image that you want to import.
|
| 4 |
Tap
. |
| 5 |
Tap Image, and then tap Import/Export.
The Import/Export dialog box appears.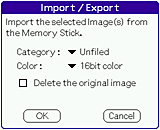
|
| 6 |
Tap OK.
DCF format image is converted to the PGP format and saved to your CLIÉ handheld. |
To cancel the operation
Tap Cancel in step 5 above.