Managing albums with the PictureGear Studio software
Exporting an album to the PictureGear Studio software
You can transfer and view albums on your computer using the PictureGear Studio software. You will need to have the PictureGear Studio software and the CLIE Album Plugin installed on your computer. For installation of the PictureGear Studio software, see PictureGear Studio functions. For installation of the CLIE Album Plugin, see CLIE Album functions.
Exporting binders
| 1 |
On the Album Index screen, tap Menu The Exchange Data With PC screen appears. 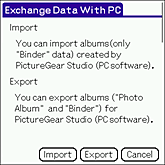 |
|---|---|
| 2 |
Tap Export. The Export Album screen appears. 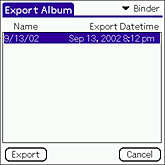 |
| 3 |
Tap the arrow in the upper-right corner and select Binder.
The list of albums created using the binder template appears on the screen. |
| 4 |
Tap and select an album that you want to export from the displayed list.
The confirmation dialog box appears. You can export only one album at a time. |
| 5 |
Tap Now if you want to export the album right away. Tap HotSync if you want to export the album during the next HotSync.
A confirmation dialog box appears. If you have selected Now, make sure to have your CLIÉ handheld ready for a HotSync operation. |
| 6 |
Tap OK.
If you have selected Now, transfer of an album starts. |
| 7 |
On your computer, start the PictureGear Studio software. Click Start, Programs (All Programs on the Windows XP), PictureGear Studio, then PictureGear Studio.
The PictureGear Studio application starts. |
| 8 |
Click Binder.
The Binder screen appears.
|
| 9 |
Click CLIE button on the tool bar and select Import from the drop-down list.
Import from CLIE dialog box appears.
|
| 10 |
Select your user name, then click OK.
A confirmation dialog box appears.
|
| 11 |
Click OK.
The Binder you have chosen in step 3 is transferred to the PictureGear Studio software.
|
Exporting photo albums
| 1 |
On the Album Index screen, tap Menu The Exchange Album With PC screen appears.  |
|---|---|
| 2 |
Tap Export.
The Export Album screen appears. |
| 3 |
Tap the arrow in the upper-right corner and select PhotoAlbum.
The list of photo albums appears on the screen. 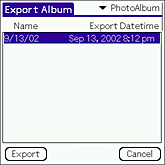 |
| 4 |
Tap and select a photo album that you want to export from the displayed list.
The confirmation dialog box appears. You can export only one photo album at a time.  |
| 5 |
Tap Now if you want to export the photo album right away. Tap HotSync if you want to export the photo album during the next HotSync.
A confirmation dialog box appears. If you have selected Now, make sure to have your CLIÉ handheld ready for a HotSync operation. |
| 6 |
Tap OK.
If you have selected Now, transfer of a photo album starts. |
| 7 |
On your computer, start the PictureGear Studio software. Click Start, Programs (All Programs on the Windows XP), PictureGear Studio, then PictureGear Studio.
The PictureGear Studio application starts. |
| 8 |
Click PhotoAlbum.
The PhotoAlbum screen appears.
|
| 9 |
Click CLIE button on the tool bar.
Import from CLIE dialog box appears.
|
| 10 |
Select your user name, then click OK.
A confirmation dialog box appears.
|
| 11 |
Click OK.
The photo album you have chosen in step 3 is transferred to the PictureGear Studio software.
|
Importing a binder from the PictureGear Studio software
You can import a binder (such as recipes and diaries) exported to your computer.
Note
You can only import binders created with the PictureGear Studio software on your computer to your CLIÉ handheld. You cannot transfer photo albums to your CLIÉ handheld.
Transferring page
| 1 |
On your computer, start the PictureGear Studio software. Click Start, Programs (All Programs on the Windows XP), PictureGear Studio, then PictureGear Studio.
The PictureGear Studio application starts. |
|---|---|
| 2 |
Click Binder.
The Binder screen appears.
|
| 3 |
Click the title which contains the page that you want to transfer from the left column.
|
| 4 |
Click and select the page that you want to transfer.
Press the Shift key and then click to select more than one page.
|
| 5 |
Click CLIE button on the tool bar and select Export Page.
Export to CLIE dialog box appears.
|
| 6 |
Select your user name, then click OK.
The transfer of the selected page starts. When the transfer is complete, click OK on the displayed confirmation screen. |
| 7 |
On your CLIÉ handheld, start the CLIE Album application.
|
| 8 |
On the Album Index screen, tap Menu
The Exchange Data With PC screen appears. |
| 9 |
Tap Import.
The Import Album screen appears. Prepare your CLIÉ handheld for a HotSync operation. Tap Update to update the list as necessary. 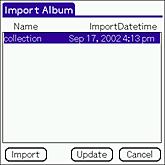 |
| 10 |
Tap and select the desired page from the list. Then tap Import.
A confirmation dialog box appears.You can select one page at a time.  |
| 11 |
Tap Now if you want to import the page right away. Tap HotSync if you want to import the page during the next HotSync.
A confirmation dialog box appears. |
| 12 |
Tap OK.
If you have selected Now, transfer of an album starts. |
Transferring title
| 1 |
On your computer, start the PictureGear Studio software. Click Start, Programs (All Programs on the Windows XP), PictureGear Studio, then PictureGear Studio.
The PictureGear Studio application starts. |
|---|---|
| 2 |
Click Binder.
The Binder screen appears.
|
| 3 |
Click the desired title from the left column.
|
| 4 |
Click CLIE button on the tool bar and select Export Title.
Export to CLIE dialog box appears.
|
| 5 |
Select your user name, then click OK.
The transfer of the selected title starts.When the transfer is complete, click OK on the displayed confirmation screen. |
| 6 |
On your CLIÉ handheld, start the CLIE Album application.
|
| 7 |
On the Album Index screen, tap Menu
The Exchange Data With PC screen appears. |
| 8 |
Tap Import.
The Import Album screen appears. Prepare your CLIÉ handheld for a HotSync operation. Tap Update to update the list as necessary.  |
| 9 |
Tap and select the desired album from the list. Then tap Import.
A confirmation dialog box appears.You can select one album at a time.  |
| 10 |
Tap Now if you want to import the album right away. Tap HotSync if you want to import the album during the next HotSync.
A confirmation dialog box appears. |
| 11 |
Tap OK.
If you have selected Now, transfer of an album starts. |
Notes on using PictureGear Studio
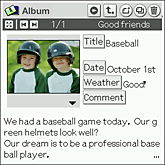
There are two types of albums used in the CLIE Album application. Note that there are some limitations when exchanging data with the PictureGear Studio software.
| • | Photo Album

| ||||
|---|---|---|---|---|---|
| • | Binder
|
Note
When you transfer a page from the PictureGear Studio software, the title of the page will also be transferred as the album name for use with the CLIE Album application. Thus, when you exchage the same page, it will be overwritten.