Managing recorded images
Viewing information on images
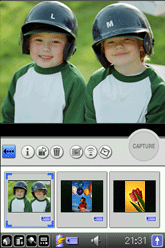
You can view detailed information of the three latest images on the CLIE Camera application. When you want to view information of the image files older than the three displayed, see the CLIE Viewer application manual.
| 1 |
Tap
The thumbnails of the three latest images appear.
|
|---|---|
| 2 |
Tap the thumbnail of the desired image. |
| 3 |
Tap
The information of the selected image appears on the screen. (Information). (Information). |
To return to the previous screen
Tap  .
.
Rotating images
You can rotate the three latest images 90 degrees to the right, 90 degrees to the left, or 180 degrees using the CLIE Camera application. When you want to rotate image files older than the three displayed, see the CLIE Viewer application manual.
| 1 |
Tap
The thumbnails of the three latest images appear. |
|---|---|
| 2 |
Tap the thumbnail of the image that you want to rotate. |
| 3 |
Tap
 (Rotate) and select the angle of rotation from the pull-down menu. (Rotate) and select the angle of rotation from the pull-down menu. |
| 4 |
Tap OK.
The rotated image is displayed. |
To return to the previous screen
Tap  .
.
Deleting images
You can delete the three latest images on the CLIE Camera application. When you want to delete image files older than the three displayed, see the CLIE Viewer application manual.
| 1 |
Tap
The thumbnails of the three latest images appear. |
|---|---|
| 2 |
Tap the thumbnail of the image that you want to delete.
|
| 3 |
Tap
The confirmation dialog box appears. |
| 4 |
Tap OK. The selected image is deleted. |
To return to the previous screen
Tap  .
.
Beaming images
You can send the three latest images to another CLIÉ handheld via the infrared communications port from the CLIE Camera application. When you want to beam image files older than the three displayed, see the CLIE Viewer application manual.
| 1 |
Prepare the receiving and sending CLIÉ handhelds for beaming.
Make sure that the Beam Receive is set to On in the Preference menu. See Handbook supplied to your CLIÉ handheld for details. |
|---|---|
| 2 |
Point the infrared communications port of the CLIÉ handhelds toward each other.
For best results, the sending and receiving CLIÉ handhelds should be 4 to 8 inches (approximately 10 to 20 centimeters) apart. |
| 3 |
Tap
The thumbnails of the three latest images appear. |
| 4 |
Tap the thumbnail of the image that you want to beam from the three thumbnails displayed on the screen. |
| 5 |
Tap
The image file is beamed to another CLIÉ handheld. |
To return to the previous screen
Tap  .
.
Editing images
You can draw on the three latest images on the CLIE Camera application using the Photo Editor application. When you want to draw on image files older than the three displayed, see the CLIE Viewer application manual.
| 1 |
Tap
The thumbnails of the three latest images appear. |
|---|---|
| 2 |
Tap the thumbnail of the image that you want to edit. |
| 3 |
Tap
The Photo Editor application starts. (Photo Editor). (Photo Editor).For details on editing images, refer to the Photo Editor application manual. |
To return to the previous screen
Tap  .
.
Pasting images on album
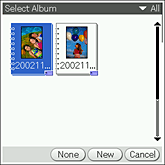
You can select an album in advance to automatically paste the captured image. You can view the album using the CLIE Album application. For details on how to use the CLIE Album application, see the operating instructions for the CLIE Album application.
| 1 |
Tap
Select Album screen appears. . . |
|---|---|
| 2 |
Select an album to paste the captured image.
|
| 3 |
Tap the CAPTURE icon to record an image.
The captured image is automatically pasted on to the selected album.To change the album, repeat steps 2 to 3, and then capture the image again. |
Notes
| • |
You can only paste images on the albums stored on the “Memory Stick” media when you have selected MS for Save as setting in the Camera preferences. Likewise, you can only paste images on the albums stored on the CLIÉ handheld when you have selected Internal for Save as setting in the Camera preferences.
|
|---|---|
| • | It takes more time to save the captured image when you first select an album to paste the image.
|
To return to the previous screen
Tap  .
.
Attaching an image to an e-mail message
You can select from the three latest images displayed on the CLIE Camera application and attach it to an e-mail. When you want to attach image files older than the three displayed, or when you want to attach more than one image file, start the CLIE Mail application from the CLIE Viewer application. See CLIE Viewer application manual for details.
| 1 |
Tap
The thumbnails of the three latest images appear. |
|---|---|
| 2 |
Tap the thumbnail of the image that you want to attach to an e-mail. |
| 3 |
Tap
The CLIE Mail application starts and Send with CLIE Mail screen is displayed with the selected image attached.For details on the CLIE Mail application, refer to the CLIE Mail application manual. |
Note
You need to install CLIE Mail application to use this feature. The icon will not be displayed when it is not installed.
To return to the previous screen
Tap  .
.