You cannot back up an album stored on your CLIÉ(TM) handheld.
Copy the album to a “Memory Stick(TM)” media beforehand.
See “Copying albums and pages” for details.
Making backups on your computer
You can backup and restore the albums created on your CLIÉ(TM) handheld and stored on a “Memory Stick(TM)” media to your computer.
Notes
| • | |
|---|---|
| • |
You need to install the CLIE Album Plugin before making backups.
For installation of the CLIE Album Plugin, see “CLIE Album functions”. |
Creating backup albums on your computer
| 1 |
Prepare your CLIÉ(TM) handheld for a HotSync(R) operation. |
|---|---|
| 2 |
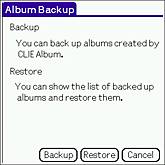
On the Album Index screen, tap Menu  , Album, then Backup Album. , Album, then Backup Album.The Album Backup screen appears.  |
| 3 |
Tap Backup.
A list of albums stored in a “Memory Stick(TM)” media appears on the screen.  The latest backup date and time appears for the albums that have been backed up. |
| 4 |
Select an album that you want to back up to your computer and tap Backup.
The confirmation dialog box appears. You can backup one album at a time.  |
| 5 |
Tap Now if you want to make a backup right away. Tap HotSync if you want to make a backup during the next HotSync(R).
If you have selected Now, make sure to have your CLIÉ(TM) handheld ready for a HotSync(R) operation. |
| 6 |
Tap OK.
If you have selected Now, backup starts. |
Restoring the backed up data file
You can restore the data backed up on your computer to a “Memory Stick(TM)” media.
| 1 |
Prepare your CLIÉ(TM) handheld for a HotSync(R) operation. |
||||
|---|---|---|---|---|---|
| 2 |
On the Album Index screen, tap Menu  , Album, then Backup Album. , Album, then Backup Album.The Album Backup screen appears.  | ||||
| 3 |
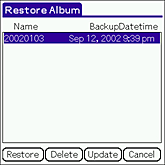
Tap Restore.
The Restore Album screen appears. The list of albums that can be restored appears on the screen. The last date and time of backup is indicated for BackupDate/time. Tips
|
||||
| 4 |
Tap and select an album that you want to restore to your CLIÉ(TM) handheld, then tap Restore.
You can restore one album at a time. The confirmation dialog box appears.  |
||||
| 5 |
Tap Now if you want to restore the album right away. Tap HotSync if you want to restore the album during the next HotSync(R).
A confirmation dialog box appears. |
||||
| 6 |
Tap OK.
If you have selected Now, the restoration of album starts. |
Notes
| • | If there is an original album in a “Memory Stick(TM)” media when you restore album, a new album of the same name will be created. The data will not be overwritten. |
|---|---|
| • | The error message appears when a “Memory Stick(TM)” media is running out of memory. Delete unnecessary data or insert a new “Memory Stick(TM)” media and perform the operation again. |