Scheduling an event
Scheduling an event for the current date
| 1 |
On the CLIE Launcher screen, rotate the Jog Dial(TM) navigator to select Date Book.
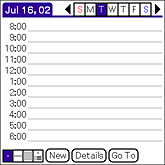
The Date Book application starts. Today’s schedule is displayed with a list of times
for a standard business day. Or, tap Date Book on the CLIE Launcher screen. You can also start the application by pressing the Date Book  |
||||
|---|---|---|---|---|---|
| 2 |
Tap the time line that corresponds to the beginning
of the event.
|
||||
| 3 |
Enter a description of the event.
You can enter a description or a note of up to 255 characters in length.
|
||||
| 4 |
If the event is one hour long, skip to step 7.
If the event is longer or shorter than one hour, tap the time of the
event to open the Set Time screen.
|
||||
| 5 |
Perform one of the following to set the duration
of the event:
|
||||
| 6 |
Tap OK.
|
||||
| 7 |
Tap a blank area of the screen to deselect the
event.
A vertical line appears next to the time, indicating the duration of the
event.
Tip
You can open the Set Time screen (to select a start
time) by tapping New, or by tapping on the time displayed on the Day view screen.
|
To schedule an untimed event
In step 5, tap No Time. A new untimed event is displayed in
the first line in Date Book screen with a  mark.
mark.
Scheduling a timed event for another date
| 1 |
On the CLIE Launcher screen, rotate the Jog Dial(TM) navigator to select Date Book.
The Date Book application starts. Or, tap Date Book on the CLIE Launcher screen. You can also start the application by pressing the Date Book |
||||
|---|---|---|---|---|---|
| 2 |
Do one of the following to select the date you
want for the event:
|
||||
| 3 |
Follow the steps for “Scheduling an event
for the current date.”
|
Tip
You can also use the scroll button on the front panel to move
forward or backward one day at a time on Day view screen or one month at a time on Go To Date screen.
To schedule an untimed event
In step 3, tap New and then tap No Time. Then follow the steps
for “Scheduling an event for the current date.”
Scheduling repeating or continuous events
The Repeat function lets you schedule events that recur at
regular intervals or extend over a period of consecutive days.
Examples of repeating or continuous events
| • | Birthday: an event that repeats annually |
|---|---|
| • | Weekly guitar lesson: an event that falls on the same day of the week and the same time of day |
| • | Business trip or vacation: a continuous event |
| 1 |
On the CLIE Launcher screen, rotate the Jog Dial(TM) navigator to select Date Book.
The Date Book application starts. Or, tap Date Book on the CLIE Launcher screen. You can also start the application by pressing the Date Book |
||||
|---|---|---|---|---|---|
| 2 |
Tap the description of the event.
|
||||
| 3 |
Tap Details.
The Event Details dialog box appears. |
||||
| 4 |
Tap the Repeat box.
The Change Repeat screen appears. |
||||
| 5 |
Tap Day, Week, Month, or Year to set how often
the event repeats.
For a continuous event, tap Day. |
||||
| 6 |
Enter a number that corresponds to how often you
want the event to repeat on the Every line.
|
||||
| 7 |
To specify an end date for the repeating or continuous
event, tap the arrow
The Ending On screen appears. |
||||
| 8 |
Tap the end date on the screen.
The Change Repeat screen appears again. |
||||
| 9 |
Tap OK.
The Event Details dialog box appears again. |
||||
| 10 |
Tap OK.
The Date Book screen appears again. Make sure that the repeat |
Notes
| • | If you change the start date of a repeating event, your CLIÉ(TM) handheld calculates the number of days you moved the event. Your CLIÉ(TM) handheld then automatically changes the end date to maintain the duration of the repeating event. |
|---|---|
| • | If you change the repeat interval (e.g., daily to weekly) of a repeating event, past occurrences (prior to the day on which you change the setting) are not changed, and your CLIÉ(TM) handheld creates a new repeating event. |
| • | If you change the date of an occurrence of a repeating event (e.g., from January 14 to January 15) and apply the change to all occurrences, the new date becomes the start date of the repeating event. Your CLIÉ(TM) handheld adjusts the end date to maintain the duration of the event. |
| • | If you change other repeat settings (e.g., time, alarm, private) of a repeating event and apply the change to all occurrences, your CLIÉ(TM) handheld creates a new event. The start date of this new event is the day on which the setting is changed. Past occurrences (prior to the day of the change) are not changed. |
| • | If you apply a change to a single occurrence of a repeating event (e.g.,
time), that occurrence no longer shows the repeat |