Printing still images
You can print out still images directly from an ink jet printer connected to the cradle supplied with your CLIÉ handheld. You do not need to connect to a computer to perform this operation.
Before performing any operation on your CLIÉ handheld, install the printer driver.
Printer setup
Installing the printer driver
Before installing the printer driver, have your CLIÉ handheld seated correctly in the cradle, ready for a HotSync operation.
| 1 |
Insert the Installation CD-ROM into the CD-ROM drive of your computer.
The installation launcher window appears.If the installation launcher window does not appear, click the CD-ROM drive icon in Windows Explorer, and then double-click Setup.exe. |
|---|---|
| 2 | Click the next button.
|
| 3 |
Click hte Install Epson Printer Drivers.
|
| 4 | Select user name and click OK.
The Install Tool screen appears.
|
| 5 |
Click Done.
The InstallShield Wizard ends. |
| 6 |
Click Exit on the installation launcher window.
|
| 7 |
Press the HotSync button on the cradle.
The HotSync operation starts and the selected printer driver is installed on your CLIÉ handheld.
|
On compatible printers
For the latest information of printers compatible with your CLIÉ handheld, refer to the support page in Sony CLIÉ Handheld website.
Printing still images from a printer
You can print out still images from a printer connected directly to the cradle supplied with your CLIÉ handheld.
Be sure to have the printer driver installed on your CLIÉ handheld before performing the operation described below.
See “Printer setup” for details.
Be sure to have the printer driver installed on your CLIÉ handheld before performing the operation described below.
See “Printer setup” for details.
| 1 |
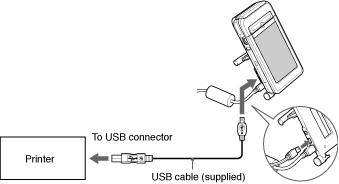
Place your CLIÉ handheld correctly in the cradle and connect the printer to the cradle using the supplied USB cable.  Note
Do not remove the USB cable during printing.
|
|---|---|
| 2 |
On the Page Index screen, tap Menu
The check box for selecting the image files appears. |
| 3 |
Tap on the check box to select a page, then tap OK.
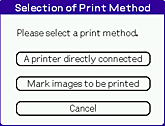
The Selection of Print Method dialog box appears. |
| 4 |
Tap and select A printer directly connected.
Printing starts.
|
To cancel the operation.
Tap Cancel in step 2 or 3.
Recording printing information on still images (DPOF)
You can record DPOF (Digital Print Order Format) information to the images pasted on a page.
This is useful when you print out the images if you record DPOF information on your CLIÉ handheld.
The selected image file will be saved on the “Memory Stick” media in DPOF even if the album is stored on your CLIÉ handheld.
This is useful when you print out the images if you record DPOF information on your CLIÉ handheld.
The selected image file will be saved on the “Memory Stick” media in DPOF even if the album is stored on your CLIÉ handheld.
| 1 |
On the Page Index screen, tap Menu
The check box for selecting the image files appears. |
|---|---|
| 2 |
Tap on the check box to select the images you want to record DPOF information.
You can select more than one image. |
| 3 |
Tap OK.
The Selection of Print Method dialog box appears. |
| 4 |
Tap Mark images to be printed.
The Print mark setting dialog box appears.
|
| 5 |
Tap Set Mark.
|
Note
You need a “Memory Stick” media to record DPOF information on the images, since the DPOF information settings are applied only to the still images stored on a “Memory Stick” media.
To cancel the operation.
Tap Cancel in step 3, 4, or 5.