Setting the Network preferences
When you sign up to an Internet Service Provider, they will send you information on your settings.
Based on this information, set up your CLIÉ handheld for the network connection.
Once you have made the preference settings, you do not have to go through this process again.
Once you have made the preference settings, you do not have to go through this process again.
Setting up ISP information
| 1 |
On the CLIE Launcher screen, rotate the Jog Dial navigator to select Prefs, and press the Jog Dial navigator.
Or, tap the Prefs icon on the CLIE Launcher screen.The Preferences screen appears. |
||||||||||||
|---|---|---|---|---|---|---|---|---|---|---|---|---|---|
| 2 |
Tap on the arrow
The Network preferences screen appears. and select Network from the drop-down list in the upper-right corner of the Preferences screen. and select Network from the drop-down list in the upper-right corner of the Preferences screen.
|
||||||||||||
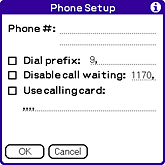
| 3 |
Enter the information as necessary on the Phone Setup screen.
|
||||||||||||
| 4 |
Tap OK.
The Network preferences screen appears.
|
 , Service, then New to enter the name of your provider.
Note
If you cannot connect to the network, check to see if there are any extra space entered for User name or Password.
Setting up detailed preference
You may be required to enter additional information depending on the provider you are using. However, for most cases, you will be able to connect to the network by setting up the network preferences as described above.
| 1 |
Tap Details on the Network preferences screen.
The Details screen appears.
|
||||||
|---|---|---|---|---|---|---|---|
| 2 |
Tap the arrow
next to the Connection type and choose an appropriate option.
For details, contact your provider or an administrator of the dial up server. |
||||||
| 3 |
Tap the arrow
next to the Idle time-out, and select time for the network connection to shut down after terminating the application that uses a network.
|
||||||
| 4 |
Tap OK.
|
Tip
You can test the network connection by tapping Connect if you have your CLIÉ handheld connected to a communication device.
Using two or more providers and dial-up points
You can set up two or more providers and dial-up points on your CLIÉ handheld. For example, you can register the telephone number of access points near your office and your home respectively to use appropriate provider or dial-up point as necessary.
Registering a provider and a dial-up point
You can register a new provider and a dial-up point by following the procedure of “Setting up ISP information”.
When you are finished with the registration, confirm the newly registered information on the Network preferences screen.
Changing the provider and the dial-up point
| 1 |
On the CLIE Launcher screen, rotate the Jog Dial navigator to select Prefs, and press the Jog Dial navigator.
Or, tap the Prefs icon on the CLIE Launcher screen.The Preferences screen appears. |
|---|---|
| 2 |
Tap the arrow
in the upper-right corner of the Preferences screen to select Network from the drop-down list. |
| 3 |
Tap Service and select a desired provider.
|
Changing the Network preferences
You can change the Network preferences on:
| • | Network preferences screen |
|---|---|
| • | NetFront v3.0 for CLIE or the Network preferences screen of the CLIE Mail application. |
Changing on the Network preferences screen
Tap the arrow in the upper-right corner of the Preferences screen to select Network. You can make changes on the settings that you have made in “Setting up ISP information” on the displayed Network preferences screen.
Changing on the preferences screen of the NetFront v3.0 for CLIE and the CLIE Mail application
You can change settings such as proxy server settings and other items required for sending and receiving e-mail messages. For details, refer to the online manual of the NetFront v3.0 for CLIE application and the operating instructions for the CLIE Mail application.