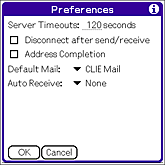
You can set your CLIÉ handheld to connect automatically to the Internet and receive e-mail messages at the desired time every day or in desired time intervals.
To enable this function, you must have your CLIÉ handheld connected to the network communication device at the designated time.
In the default setting, your CLIÉ handheld is not set to receive e-mail messages automatically.
Advanced operations for the CLIÉ handheld
Receiving e-mail automatically
| 1 |
Tap Menu
The Preferences screen appears. |
||||||
|---|---|---|---|---|---|---|---|
| 2 |
Tap the arrow
 next to Auto Receive, then tap the desired option. next to Auto Receive, then tap the desired option.
|
||||||
| 3 |
If you have selected Time, tap the time field to set the desired time for connecting to the network.
If you have selected Interval, enter the desired interval time to connect to the network. Set time interval of 5 minutes or longer. |
||||||
| 4 |
Tap OK.
A reception reservation is set and the mail list screen appears.
|
Sorting e-mail messages according to rules (filtering e-mail)
You can specify filters to automatically sort newly arrived mail into specific categories.
By setting a filter, you can refuse e-mail messages which meet specific conditions or sort e-mail messages, automatically sending them to a specific category.
By setting a filter, you can refuse e-mail messages which meet specific conditions or sort e-mail messages, automatically sending them to a specific category.
| 1 |
Tap Menu
The Filters screen appears.
|
||||||||||
|---|---|---|---|---|---|---|---|---|---|---|---|
| 2 |
Tap New.
The Filter Editor screen appears.
|
||||||||||
| 3 |
Specify the filter setting.
|
||||||||||
| 4 | Tap OK. | ||||||||||
| 5 |
To activate the filter, tap to select the check box of the desired filter on the Filters screen.
The selected filter is activated.
|
||||||||||
| 6 |
Tap OK.
The e-mail list screen appears.
|
||||||||||
| 7 |
Tap
The Receive screen appears. on the e-mail list screen. on the e-mail list screen. |
||||||||||
| 8 |
Tap the check box for Use filters.
|
||||||||||
| 9 |
Tap OK.
|
To temporarily cancel filtering
Tap to clear the check box of the filter in step 5 above.
To delete the filter
Tap Delete in step 4 above.
Tap OK when the confirmation dialog box appears.Setting advanced e-mail receiving options
You can choose to receive only the e-mail header, which contains
the from, subject, and date items, and just the first few lines of the
text.
You can then choose to receive the remainder of the e-mail text
for messages you want to read the entire text.
You can also specify the number of e-mail messages to be downloaded in a single connection.
Use this function to reduce telecommunication costs, but
still get the messages you need.
You can also specify the number of e-mail messages to be downloaded in a single connection.
| 1 |
Tap
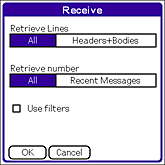
The Receive screen appears. on the e-mail list screen. on the e-mail list screen.
 |
||||
|---|---|---|---|---|---|
| 2 |
Select the number of text lines you want to receive in one connection.
|
||||
| 3 |
Select the number of e-mail messages you want to receive in one connection.
|
||||
| 4 |
When you want to use filters function at the same
time, tap and select the check box next to Use Filters.
When using filters together with the advanced receive function, you receive only the e-mail
messages which meet all the conditions set on the Receive screen and Filters screen. For details
about filtering e-mail messages, see “Sorting e-mail messages according to rules (filtering e-mail)”.
|
||||
| 5 | Tap OK. |
If you have chosen to receive only part of an e-mail message
“Retrieve on next connecting” check box appears at the end of the text.
Tap to select this check box to receive the remainder of the message at next receiving.
Tap to select this check box to receive the remainder of the message at next receiving.
Creating a signature
You can register an e-mail signature.
After registering your signature, you can add it automatically when you send e-mail messages.
After registering your signature, you can add it automatically when you send e-mail messages.
| 1 |
Tap Menu
The Signatures screen appears.
|
|---|---|
| 2 |
Tap the arrow
You can register up to three signatures. , and then tap the type of signature. , and then tap the type of signature.This function is convenient for using different signatures in different situations. |
| 3 |
Enter the signature, and then tap OK.
The signature is automatically added to your e-mail messages.
|
To switch the signature
Tap the arrow  , and then tap the signature you want on the signature screen.
 , and then tap the signature you want on the signature screen.
To cancel the adding of the signature
Tap the arrow  , and then tap No Signatures on the signature screen.
 , and then tap No Signatures on the signature screen.
Note
The signature will not be added to e-mail messages sent from other applications with files attached.
Setting display options
Selecting the sort order
In the CLIE Mail application, e-mail messages are displayed in order by date and time. You can also display e-mail messages by sender or subject.
| 1 |
Tap the column you want to sort by when displaying e-mail messages on the e-mail list screen.
E-mail messages are displayed in the selected order.When you tap the same column again, e-mail messages are displayed in the reverse order. |
|---|
Selecting the items displayed
In the CLIE Mail application, the sender, date, and subject
are displayed for each e-mail message. However, you can select
which items are to be displayed.
| 1 |
On the e-mail list screen, tap the arrow
The Show Options dialog box appears. |
|---|---|
| 2 | Tap to select the check box next to the items you want to display on the e-mail list screen. |
| 3 |
Tap OK.
The items you have selected are displayed.
|
Changing e-mail accounts
You can use up to eight e-mail accounts with CLIE Mail application. To set up multiple e-mail accounts, follow the procedure described in “Setting the mail account”.
Note
You can receive e-mail from all e-mail accounts at once, but you can only send
e-mail from one account at a time. If you want to send an e-mail message
from different account, switch to the account you want to use, and then send the
e-mail message.
| 1 |
Tap Menu
The Accounts screen appears. |
|---|---|
| 2 | Tap to select the check box of the account you want to activate. |
| 3 |
To switch to the e-mail account you want to use to send a message, tap the desired account, and then tap Set to Outgoing Server.
The Outgoing server changes to that of the selected account.
|
| 4 | Tap OK. |