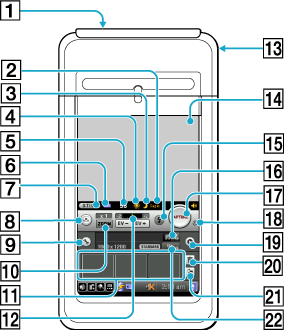
Locating parts and controls of CLIE Camera S
[1] Lens
Lens for the internal camera.
[2] Effect setting indicator
Displays the currently selected effect. The indicator will not appear when nothing is selected.
[3] Scene indicator
Displays the currently selected scene. The indicator will not appear when Normal is selected.
[4] White Balance indicator
Displays the current white balance setting.
The indicator will not appear when Auto is selected.
The indicator will not appear when Auto is selected.
[5] Counter
Indicates the number of images you can record with the amount of memory currently available on the CLIÉ handheld or the “Memory Stick” media.
The indicated number may differ depending on the size of the image and conditions of the subject of your photograph.
The indicated number may differ depending on the size of the image and conditions of the subject of your photograph.
[6] Save to setting indicator
Indicates the CLIÉ handheld icon or “Memory Stick” media icon according to the setting you have selected on the Save to field in the Camera Setup screen.
[7] Movie Recorder button
Starts the Movie Recorder application.
Note
It takes a few seconds to switch from the CLIE Camera S application to the Movie Recorder application.
[8] Custom button
Indicates the setting for a function that you have selected in Custom Button setting on the Camera Setup screen.
Tap to switch through and select the setting items for the function applied to the button.
Tap to switch through and select the setting items for the function applied to the button.
[9]  (Camera Setup) button
Displays the Camera Setup screen where you can adjust various camera settings, including capture sound, white balance, and effect setting.
[10] Zoom setting button
Zooms in by x 1 or x 2 the size of the subject of your photograph when directing the camera. Tap on the button to select zoom.
Note
Zoom function is available for image sizes 800 x 600 or smaller.
[11] Thumbnails
Shows thumbnails of the three latest captured images.
Thumbnail is grayed out when the image has been deleted in other application, or when a different “Memory Stick” media is inserted.
Thumbnail is grayed out when the image has been deleted in other application, or when a different “Memory Stick” media is inserted.
[12] Brightness indicator
Tap [EV-]/[EV+] to adjust the brightness level.
[13] CAPTURE button
Press this button on the CLIÉ handheld to capture still images with the camera.
[14] Viewfinder
Displays the image the camera is currently seeing.
[15]  Flash button
Flash button
Tap to switch the flash mode setting.
[16]
 Album select button
Displays the screen where you can select or newly create an album to paste the image to be captured.
 Album start button
Starts the CLIE Album application. This button does not operate if the CLIE Album application is not ready.
See the operating instructions for the CLIE Album application for details.
See the operating instructions for the CLIE Album application for details.
[17] CAPTURE button
Tap this button on the screen to capture an image.
[18] Self Timer indicator
Appears when the Self Timer setting is turned On.
[19]  (CLIE Viewer) button
(CLIE Viewer) button
Starts the CLIE Viewer application to view recorded images.
[20] Delete button
Tap this button to delete an image from the latest three images displayed in the lower half of the screen.
[21] Rotate button
Tap this button to rotate an image from the latest three images displayed in the lower half of the screen.
Notes
| • | The quality of the image will not get reduced by rotation. |
|---|---|
| • | The images that you have selected to rotate using this application may not appear rotated in other applications or on a computer. |
| • | The enlarged image displayed on the viewfinder will not rotate when you select rotate button. You can view the rotated image on the thumbnail, or in the CLIE Viewer application. |
[22] Size, Quality button
Tap to select the size and quality of the image from three settings.
You can create original setting in the Camera Setup screen.
Tap to switch through the settings.
You can create original setting in the Camera Setup screen.
Tap to switch through the settings.