| Setting the camera preferences |  |
Before taking a picture, adjust the preference settings as desired. Settings remain in effect until you change them.
| 1 |
Tap Applications tab, and tap the CLIE Camera application icon from the Applications screen.
| • |
When you start the application first time, the screen for Flicker Control is displayed. Tap OK to close the screen.
|
| • |
You can also start CLIE Camera by either pressing the capture button or opening the lens cover.
|
|
| 2 |
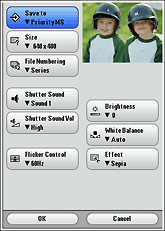
Tap  (Camera Preferences). The Camera preferences screen appears.
|
| 3 |
Tap the arrow  to adjust the camera preferences as necessary.
| • |
Save to: Specifies where to store the captured image. Select from PriorityMS, MS, or Handheld.
| – |
PriorityMS: Records the images on the “Memory Stick™” media. If it is not inserted in your CLIÉ™ handheld, the data will be recorded on your CLIÉ™ handheld.
|
| – |
MS: Records the images on the “Memory Stick™” media.
|
| – |
Handheld: Records the images on your CLIÉ™ handheld.
|
|
| • |
Size: Select the image size.
|
| • |
File Numbering:
| – |
Series: Numbers the files in captured order even when you delete or move the files by using other applications. You can manage the files in different names.
|
| – |
Reset: New files are numbered after the existing still image file, if there was any already stored on a "Memory Stick™" media that you are saving to.
|
|
| • |
Shutter Sound: Select the shutter sound from three sound types.
|
| • |
Shutter Sound Vol:Select from Low, Medium, or High.
|
| • |
Flicker Control*: If the screen flickers under the fluorescent light, adjust the frequency setting (50Hz or 60Hz).
Note
Flicker may not disappear if the subject is too bright.
|
| • |
Brightness*: Select a brightness level setting from -2 to +2.
|
| • |
White Balance*: Choose a white balance setting based on the lighting conditions. Select from Auto, Indoor A (incandescent light), Indoor B (fluorescent light), and Outdoor.
| – |
Auto: Adjusts white balance automatically.
|
| – |
Indoor A: Select when recording under a incandescent light.
|
| – |
Indoor B: Select when recording under a fluorescent light.
|
| – |
Outdoor: Select when recording outside (daylight).
|
|
In some conditions, White Balance may not operate properly. In this case, adjust the balance manually.
| • |
Effect*: Changes the color and the contrast. Select from OFF, B&W (monotone), and Sepia (sepia tone).
| – |
Off: The effect is not selected.
|
| – |
B&W: The images are recorded in black and white.
|
| – |
Sepia: The images are recorded in a brown tint.
|
|
| * |
The effect of these setting options can be viewed in the preview window in the Camera preferences screen.
|
|
| 4 |
Tap OK.
To cancel the operation, tap Cancel.
|