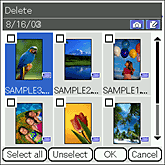
The check box for selecting files appears.
| Organizing the files |  |
Deleting files
| 1 |
Tap
 |
|---|---|
| 2 |
Tap the check box for the file that you want to delete.
To select all files displayed, tap Select all.
|
| 3 |
Tap OK.
The confirmation dialog box is displayed.
 |
| 4 |
Tap OK.
|
To cancel the operation
Tap Cancel in step 3 or 4.
Copying the files
| 1 |
Tap Menu
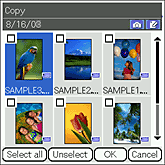
The check box for selecting the files appears.
 |
|---|---|
| 2 |
Tap the check box for the file that you want to copy.
If you want to select all the files displayed, tap Select all.
|
| 3 |
Tap OK.
The Media Selection screen is displayed.
|
| 4 |
Tap the arrow
You can copy files within your CLIÉ™ handheld. You can also copy files to “Memory Stick™” media.
|
| 5 |
Tap Copy.
|
To cancel the operation
Tap Cancel in step 3 or 5 above.
Moving files
You can move the selected files to other media.
| 1 |
Tap Menu
The check box for selecting the files appears.
|
|---|---|
| 2 |
Tap the check box for the file that you want to move.
If you want to select all the files displayed, tap Select all.
|
| 3 |
Tap OK.
The Media Selection dialog box is displayed.
|
| 4 |
Tap the arrow
Note
You cannot move a file to the currently stored media.
|
| 5 |
Tap Move.
|
To cancel the operation
Tap Cancel in step 3 or 5 above.
Rotating still images
You can rotate still images. This is handy when you want to view images at different angles.
| 1 |
Tap Menu
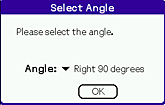
The Select Angle dialog box is displayed.
 |
|---|---|
| 2 |
Tap the arrow
|
| 3 |
Tap OK.
The check box for selecting the files appears.
|
| 4 |
Tap the check box for the file for which you want to rotate.
If you want to select all the files displayed on the screen, tap Select all.
|
| 5 |
Tap OK.
|
To cancel the operation
Tap Cancel in step 3 or 5 above.
Notes
| • |
The quality of the image will not change due to rotation. |
|---|---|
| • |
The images that you have selected to rotate using this application may not appear rotated in other applications or on a computer. |
Recording printing information on still images (DPOF)
You can record DPOF (Digital Print Order Format) information to the selected files.
The selected image file will be saved on “Memory Stick™” media in DPOF.
| 1 |
On the CLIE Viewer list screen, tap Menu
The check box for selecting the image files appears.
|
|---|---|
| 2 |
Tap the check box for the file that you want to record DPOF information.
If you want to select all the files displayed, tap Select all.
|
| 3 |
Tap OK.
The Print mark setting dialog box is displayed.
|
| 4 |
Tap Set Mark.
The DPOF information is recorded to the selected image.
|
Note
You need “Memory Stick™” media to record DPOF information for the images, since the DPOF information settings are applied only to the still images stored on “Memory Stick™” media.
To cancel the operation.
Tap Cancel in step 3 or 4.