Managing album
Deleting albums and pages
| 1 |
Tap
The Delete Album or Delete Page screen appears.
|
|---|---|
| 2 |
Tap and select the check box of the albums or pages that you want to delete. Tap on Select All to delete all the albums displayed on the screen. The confirmation dialog box appears.
|
| 3 |
Tap OK.
The selected albums or pages are deleted.
To cancel the operation, tap Cancel. |
Note
Tap  on the Page screen to delete the displayed page.
Copying albums and pages
Copying an album
You can create a copy of the selected album on a “Memory Stick” media or your CLIÉ handheld.
| 1 |
On the Album Index screen, tap Menu
The Select Album screen appears.
 , Album, then Copy Album. , Album, then Copy Album.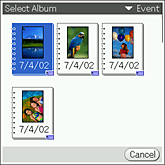 |
|---|---|
| 2 |
Tap and select an album that you want to copy.
The Album Copy screen appears. |
| 3 |
Tap the arrow
|
| 4 |
Tap OK.
To cancel the operation, tap Cancel.
|
Copying a page to other album
You can create a copy of the selected page on another album.
| 1 |
On the Page screen, tap Menu
The Select Album screen appears.
, Page, then Copy Page. |
|---|---|
| 2 |
Tap and select the album to make copy to.
The page is copied to the selected album.
To cancel the operation, tap Cancel. |
Viewing album information
|
On the Page Index screen, tap
The Album Information screen appears. . .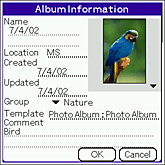
|
Moving page
| 1 |
On the Page Index screen, tap
Or, tap Menu  . . , Page, then Move Pages. The Move Page screen appears. , Page, then Move Pages. The Move Page screen appears. |
|---|---|
| 2 |
Tap a page to move.
 or or  mark appears on the selected page. mark appears on the selected page. |
| 3 |
Tap on a page where you want to move the page selected in step 2.
The page you have selected in step 2 moves before the page you have selected in step 3. |
| 4 |
Repeat steps 2 and 3 to move more than one page.
|
| 5 |
Tap OK.
The pages are arranged in the selected order.To cancel the operation, tap Cancel. |
Beaming a page
You can send a page to another CLIÉ handheld via the infrared communications port.
Note
You can only beam one notebook at a time.
| 1 |
On the Page screen, tap Menu
The confirmation dialog box appears.
, Page, then Beam.
|
|---|---|
| 2 |
Tap OK.
The beaming starts.The image stored on the “Memory Stick” media is sent to the “Memory Stick” media of receiving CLIÉ handheld. Likewise, the image stored on your CLIÉ handheld is sent to the receiving CLIÉ handheld. |
Using still images on a page in PhotoStand
You can select an image on a page and display it one after another as a PhotoStand.
| 1 |
On the Page Index screen, tap Menu
The check box appears on the image., Output, then PhotoStand. |
|---|---|
| 2 |
Tap on the check box to select the images you want to use for PhotoStand.
Or, rotate the Jog Dial navigator and press the Jog Dial navigator to select an image. You can select more than one image. |
| 3 |
Tap OK.
The PhotoStand application starts and the PhotoStand Settings screen appears.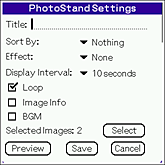 |
| 4 |
Make settings as necessary.
For details on the settings and further operations on the PhotoStand application, see Making a PhotoStand files.
|
Recording printing information on still images (DPOF)
You can record DPOF (Digital Print Order Format) information to the images pasted on a page. It is convenient when you print out the images if you record DPOF information on your CLIÉ handheld.
| 1 |
On the Page Index screen, tap Menu
The check box for selecting the image files appears., Output, then Print. |
|---|---|
| 2 |
Tap on the check box to select the images you want to record DPOF information.
You can select more than one image. |
| 3 |
Tap OK.
The Setting print marks screen appears. |
| 4 |
Tap Mark.
|
Note
You need a “Memory Stick” media to record DPOF information on the images, since the DPOF information settings are applied only to the still images stored on a “Memory Stick” media. The image file are saved on the “Memory Stick” media even when the album is stored on your CLIÉ handheld.
To cancel the operation.
Tap Cancel in step 3.
Changing font
You can change size of letters used on the screen.
|
Tap Menu
The size of letters displayed on the screen gets smaller.
Tap Change Font again to return to the original size.
, View, then Change Font. |