Recording still images
Recording still images
| 1 |
Rotate the Jog Dial navigator on the CLIE Launcher screen to select CLIE Cam S, and press the Jog Dial navigator.
The CLIE Camera S application starts.
Or, tap the CLIE Cam S icon on the CLIE Launcher screen. Note
It takes a few seconds to start the CLIE Camera S application.
 Tip
You can also start the CLIE Camera S application by pressing the CAPTURE button on your CLIÉ handheld by the default setting. To assign another application to start from this button, see “CLIE Camera S menu items.”
|
||||||||
|---|---|---|---|---|---|---|---|---|---|
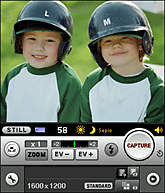
| 2 |
Set your CLIÉ handheld to the turned style, and aim the lens at the subject of your photograph.
To take a picture of yourself, set your CLIÉ handheld to the opened style.The mirror image of yourself will be automatically displayed on the screen (however, the captured image will be a mirror-reversed image). |
||||||||
| 3 |
Make following adjustments as necessary.
|
||||||||
| 4 |
Press and hold the CAPTURE button on your CLIÉ handheld half way down.
Focus, white balance, and exposure settings are adjusted and fixed to the selected settings automatically.
Tip
Indicator flashes in green while adjusting, and stops when the settings are fixed with a short beep sound. The indicator continues to flash in slower speed if there is a possibility that the focus has not been adjusted correctly. |
||||||||
| 5 |
Press the CAPTURE button on your CLIÉ handheld fully down.
The captured images will be saved on your CLIÉ handheld or the “Memory Stick” media depending on the setting you have made in the Camera Setup screen. |
Tip
You can also capture images by tapping the CAPTURE icon on the screen in step 5. In this case, a capture sound is heard and the captured images will be saved on your CLIÉ handheld or the “Memory Stick” media.
Notes
| • |
 appears on the viewfinder when the camera is not stable. In this case, use flash or hold the camera steadily in place. appears on the viewfinder when the camera is not stable. In this case, use flash or hold the camera steadily in place. |
|---|---|
| • |
The focus may not be adjusted correctly when you press the CAPTURE button fully down at once or tap the CAPTURE button on the screen in AF(Always) or AF(One Shot) mode.
|
| • |
You may find it difficult to focus on certain subjects due to the hardware property. In this case, define the focal point by moving the AF frame to a point where there is a strong contrast, such as the lines of a person’s face or eyes, and adjust the focus.
|
On storing images
When you select “Memory Stick” media (MS) for Save to setting on the Camera Setup screen, the recorded images are stored in the \DCIM\***MSDCF folder (“***” are numbers from 101 to 999). For the specific location of the folder, see “About files stored on “Memory Stick” media.”
On numbering image files
The recorded images are numbered in the captured order.
If the images are saved to a “Memory Stick” media, a new folder will be created automatically when the folder gets full.
The image will be numbered in the captured order when a new file is created, or when a new “Memory Stick” media is inserted.
To reset the file number, tap Menu, Options, then Consecutive Numbering.
Using the zoom function
Using the zoom function, you can capture a magnified image of the subject of your photograph.
|
Tap
The image is recorded in the selected zoom level. When you assign Zoom for Jog Dial setting in the Camera Setup screen, you can change the zoom level by rotating the Jog Dial navigator. Rotate the Jog Dial navigator upward to select x 1 and downward to select x 2. The zoom level will not increase or decrease more than specified by scrolling further up or down. |
Notes
| • |
The resolution of the image you see on the viewfinder gets lower when you use the zoom (x 2) function.
|
|---|---|
| • |
You cannot apply zoom x 2 to image sizes 1280 x 960 or larger.
|
Using the flash
Using the flash, you can capture images in dark places.
The flash mode setting is indicated at the upper left-hand corner of the viewfinder.
|
Tap
 (Flash) to switch flash mode. (Flash) to switch flash mode.
|
 (Forced flash): Select when you want to use flash regardless of the current light conditions.
 (No flash): Select when you do not want to use flash.
Note
Flash setting that you have selected on the main screen returns to the default setting when you quit application.
To save this setting, select Flash in the Save Setting screen.
To save this setting, select Flash in the Save Setting screen.
Using the self-timer
Using the self-timer function, you can have the camera to start recording 10 seconds after pressing the CAPTURE button.
| 1 |
Tap
Or, hold down the Jog Dial navigator.  on the main screen. on the main screen.The Camera Setup screen appears. |
|---|---|
| 2 | Rotate the Jog Dial navigator to select Self Timer, and press the Jog Dial navigator.
A drop-down list of setting options appears. |
| 3 | Rotate the Jog Dial navigator and select ON.
|
| 4 | Tap OK.
The main screen appears.
|
| 5 |
Adjust the screen position, and aim the lens at the subject of your photograph.
|
| 6 |
Press CAPTURE button on your CLIÉ handheld to record an image.
Or, tap the CAPTURE icon on the screen.An image will be recorded automatically in 10 seconds. The captured images will be recorded on your CLIÉ handheld or the “Memory Stick” media depending on the setting you have made in the Camera Setup screen. |
To cancel self timer
Tap  .
.
The main screen appears.
.Tip
If you often use the self-timer function, it is useful to assign the function to the custom button.
Viewing recorded images
Thumbnails of the three latest images are displayed on the screen.
To view other images, start the CLIE Viewer application.
You can start the CLIE Viewer application from the CLIE Camera S application.
To view other images, start the CLIE Viewer application.
You can start the CLIE Viewer application from the CLIE Camera S application.
|
Tap
The CLIE Viewer application starts.
 . . |