Setting advanced camera preferences
You can select advanced settings to meet the situation or your taste.
You can also apply functions to Jog Dial navigator and custom button, and make other settings to customize CLIE Camera S.
The settings you have made previously in “Setting basic camera preferences” are sufficient to capture images.
If you want to capture images right away, skip the settings below, and jump to “Recording still images”.
Selecting white balance
You can select a white balance setting based on the current lighting conditions.
| 1 |
Tap
Or, hold down the Jog Dial navigator.  on the main screen. on the main screen.The Camera Setup screen appears. |
||||||||||
|---|---|---|---|---|---|---|---|---|---|---|---|
| 2 | Rotate the Jog Dial navigator to select White Balance, and press the Jog Dial navigator.
A drop-down list of setting options appears. |
||||||||||
| 3 | Rotate the Jog Dial navigator and select a desired option.
Note
White Balance setting returns to the default setting when you quit the application. To save this setting, select White Balance in the Save Setting screen.
|
Changing settings for size and quality
You can select size and quality and create up to three original setups which you can select by pressing the  on the main screen.
| 1 |
Tap
Or, hold down the Jog Dial navigator. on the main screen.The Camera Setup screen appears. |
||||
|---|---|---|---|---|---|
| 2 | Rotate the Jog Dial navigator to select Size, Quality, and press the Jog Dial navigator.
The Size, Quality screen appears.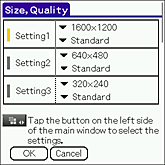 |
||||
| 3 | Rotate the Jog Dial navigator to select the setting that you want to change.
Or, tap the desired setting.A yellow indicator appears on the selected setting. |
||||
| 4 |
Tap the arrow
 to select size and quality. to select size and quality.
|
||||
| 5 |
Tap OK.
|
Using spot metering
You can adjust exposure and focus to the selected point by tapping on the viewfinder.This function is useful when capturing image against the sun, or when the background of the subject provides high contrast.
| 1 |
Tap
Or, hold down the Jog Dial navigator. on the main screen.The Camera Setup screen appears. |
||||
|---|---|---|---|---|---|
| 2 | Rotate the Jog Dial navigator to select Spot Metering, and press the Jog Dial navigator.
A drop-down list of setting options appears. |
||||
| 3 |
Rotate the Jog Dial navigator and select a desired option.
|
Changing the flash light level
You can change the brightness of the flash.
| 1 |
Tap
Or, hold down the Jog Dial navigator. on the main screen.The Camera Setup screen appears. |
||||||
|---|---|---|---|---|---|---|---|
| 2 | Rotate the Jog Dial navigator to select Flash Level, and press the Jog Dial navigator.
A drop-down list of setting options appears. |
||||||
| 3 | Rotate the Jog Dial navigator and select a desired option.
|
Selecting focus mode
You can select to adjust focus manually or automatically.
| 1 |
Tap
Or, hold down the Jog Dial navigator. on the main screen.The Camera Setup screen appears. |
||||||
|---|---|---|---|---|---|---|---|
| 2 | Rotate the Jog Dial navigator to select Focus from the left column, and press the Jog Dial navigator.
A drop-down list of setting options appears. |
||||||
| 3 | Rotate the Jog Dial navigator and select a desired option.
Note
The Focus setting returns to the default setting when you quit application.
To save this setting, select Focus in the Save Setting screen. |
Applying effects
You can apply an effect to the captured image by selecting the setting beforehand.
| 1 |
Tap
Or, hold down the Jog Dial navigator. on the main screen.The Camera Setup screen appears. |
||||||
|---|---|---|---|---|---|---|---|
| 2 | Rotate the Jog Dial navigator to select Effect, and press the Jog Dial navigator.
A drop-down list of setting options appears. |
||||||
| 3 | Rotate the Jog Dial navigator and select a desired option.
Note
The Effect setting returns to the default setting when you quit the application. To save this setting, select Effect in the Save Setting screen.
|
Customizing CLIE Camera S
You can make the following adjustments to customize CLIE Camera S.The default settings are indicated with asterisks (*), and the currently selected settings are indicated with a yellow indicator.