If your Home screen is the CLIE Launcher or Palm® OS standard screen, tap the CLIE Organizer icon.
| Address Book screen |  |
Viewing the Address Book screen
Address Book screen
| 1 |
Tap the Home icon.
|
|---|---|
| 2 |
Tap the Address tab.
|
 |
 |
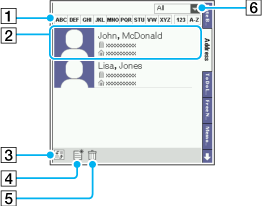
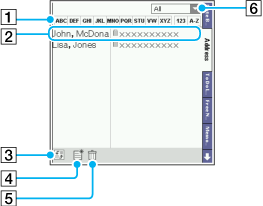
| Thumbnail view | List view |
[1] Index tab
Index tab organizes the Address entries in the alphabetical order. When you enter a new Address entry, it is automatically divided under the Address tab. Tap the tab to view the entries under the tab.
When you select "Last Name, First Name" or "Company, Last Name", the address entries are sorted in alphabetical order of the company name, and then an individual’s last name.
[2] Address entry
Displays the Address entry. Tap the entry to view the entry's information.
| • |
Thumbnail*: Displayed the pasted image as a thumbnail. |
|---|---|
| • |
Name |
| • |
Additional information: Displays two items you have entered, such as a telephone number and e-mail address on Address Book. The List view displays the contact information you use (Primary Contact). The Thumbnail view displays Primary Contact and the phone number or e-mail address listed in the topmost field of the Address Book entry.
|
| • |
Free Note Link icon*: Displayed when the Free Notes item is attached. |
| • |
Comment icon*: Displayed when a note is attached. |
| * |
Displayed in the Thumbnail view. |
|---|
Additional Information displays following icons, such as phone and e-mail icons.
[3] Change button
Changes the List view and Thumbnail view.
[4] New button
Displays the Address Edit screen. For details on edition the address information, see "Creating a new Address Book entry".
[5] Delete button
Displays the Delete screen. For details, see "Deleting the multiple of Address Book entries".
[6] Category list
Tap  to select the category you want to display on the Address Book screen.
Address View screen
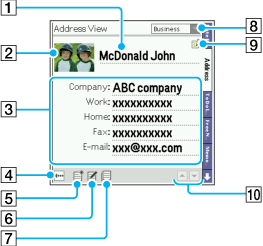
Tap an Address entry to display the Address View screen.

[1] Name
[2] Thumbnail
Displays the pasted image as a thumbnail.
[3] Items
Lists item including the phone number and note.
[4] Back button
Goes back to the Address Book screen.
[5] New button
Creates a new Address Book entry.
For details on creating an Address Book entry, see "Creating a new Address Book entry".
[6] Edit button
Edits the existing Address Book entry.
For details on editing an Address Book entry, see "Editing the Address Book entry".
[7] Copy button
Copies the existing Address Book entry. The copied data includes "Copy" at the tail of First name.
[8] Category
Displays the current category of Address Book.
[9] Free Note Link icon
Displayed when the Free Notes item is attached. Tap this icon to display the Free Note Link screen.
[10] Scroll arrows
Scroll up or down the Address View screen.
Creating a new Address Book entry
| 1 |
Tap the Home icon.
If your Home screen is the CLIE Launcher or Palm® OS standard screen, tap the CLIE Organizer icon.
|
|---|---|
| 2 |
Tap the Address tab.
 |
| 3 |
Tap
The Address Edit screen is displayed.
|
| 4 |
Enter the last name of the person you want to add to Address Book.
The first letter of each field (except numeric and e-mail fields) is automatically capitalized.
|
| 5 |
Tap First name.
The cursor shifts to the First name field.
Note
The first letter in each entry field becomes uppercase excluding the field for the e-mail address. You do not have to use the Caps key to enter the capital letter.
|
| 6 |
Enter the first name in the First name field.
|
| 7 |
Repeat steps 4 and 5 to enter the other items of information that you want to include.
You can tap the arrow
|
| 8 |
To move to the next items of information, tap the scroll arrow
|
| 9 |
After you have finished entering all the necessary information, tap Done.
The Address screen is displayed again.
|
Note
When you use a semicolon (;) in the Phone number field, the characters following the semicolon (;) will not be sent when you send the information via the infrared communications port.
You can also use the CLIE Organizer for PC software to create entries on your computer and then download them to your CLIÉ™ handheld during the next HotSync® operation.
For details on the HotSync® operation, refer to the Handbook provided with your CLIÉ™ handheld.
Importing the information created on your computer
| • |
You can import the information that you have created by using the CLIE Organizer for PC software on your computer. For details, see "Performing the HotSync® operation" in Handbook. |
|---|---|
| • |
You can also import the vCard-format file stored on “Memory Stick™” media. For details, see "Importing the Address Book entry from “Memory Stick™” media". |
Deleting the Address Book entry
| 1 |
On the Address Book screen, tap the Address Book entry that you want to delete.
|
|---|---|
| 2 |
Tap
The Address Edit screen is displayed.
|
| 3 |
Tap Delete.
The Delete Address dialog box is displayed.
|
| 4 |
Tap OK.
The Address Book entry selected in step 1 is deleted.
|
If you tap the check box for "Save archive copy on PC", the deleted Address Book entry will be saved to the CLIE Organizer for PC software on your computer during the next HotSync® operation. To view the saved data, start CLIE Organizer for PC software on your computer. Choose File, then Open Archive.
Deleting the multiple of Address Book entries
| 1 |
On the Address Book screen, tap
The Delete screen is displayed.
|
|---|---|
| 2 |
Tap the check box for the Address Book entry that you want to delete.
To delete all the Address Book entries, tap Select All.
To deselect all the Address Book entries, tap Cancel All.
|
| 3 |
Tap Delete.
The Delete Address dialog box is displayed.
|
| 4 |
Tap OK.
If you tap the check box for "Save archive copy on PC", the deleted Address Book entry will be saved to the CLIE Organizer for PC software on your computer during the next HotSync® operation. To view the saved data, start CLIE Organizer for PC on your computer. Choose File, then Open Archive.
|