You can transfer and view albums on your computer using the PictureGear Studio software. Install the PictureGear Studio software and the CLIE Album Plugin on your computer before performing the operation described below.
For installation of the PictureGear Studio software, see “PictureGear Studio functions”.
For installation of the CLIE Album Plugin, see “CLIE Album functions”.
Managing albums with the PictureGear Studio software
Exporting an album to the PictureGear Studio software
Note
You can only export the albums that are stored on a storage media to your computer.
Exporting binders
| 1 |
On the Album Index screen, tap Menu
The Exchange Data With PC screen appears.
 , Album, then Exchange Data with PC. , Album, then Exchange Data with PC.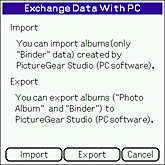 |
|---|---|
| 2 |
Tap Export.
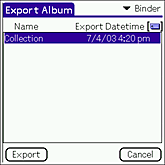
The Export Album screen appears.
Note
Make sure that you have your CLIÉ™ handheld ready for a HotSync® operation.
|
| 3 |
Tap the arrow
A list of albums created using the binder template appears on the screen.
Note
Only the binders stored on a storage media appear.
You can select a storage media by tapping the storage media icon at the upper-right corner of the Export Album screen.
|
| 4 |
Tap and select an album that you want to export from the displayed list, and tap Export.
You can export only one album at a time.
The Confirmation dialog box appears.  |
| 5 |
Tap OK.
The Confirmation dialog box appears.
|
| 6 |
Tap OK.
The transfer of a binder through a HotSync® operation starts. |
| 7 |
On your computer, start the PictureGear Studio software.
Click Start, Programs (All Programs on Windows® XP), PictureGear Studio, then PictureGear Studio.The PictureGear Studio application starts. |
| 8 |
Click Binder.
The Binder screen appears.
|
| 9 |
Click CLIE button on the tool bar and select Import from the drop-down list.
Import from CLIE dialog box appears.
|
| 10 |
Select your user name, then click OK.
The Confirmation dialog box appears.
|
| 11 |
Click OK.
The Binder you have chosen in step 4 is transferred to the PictureGear Studio software.
|
Exporting photo albums
| 1 |
On the Album Index screen, tap Menu
 , Album, then Exchange Data with PC. , Album, then Exchange Data with PC.The Exchange Album With PC screen appears.  |
|---|---|
| 2 |
Tap Export.
The Export Album screen appears.
Note
Make sure that you have your CLIÉ™ handheld ready for a HotSync® operation.
|
| 3 |
Tap the arrow
A list of albums created using the photo album template appears on the screen. 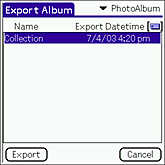 |
| 4 |
Tap and select a photo album that you want to export from the displayed list, then tap Export.
You can export only one photo album at a time.
The Confirmation dialog box appears.  |
| 5 |
Tap OK.
The Confirmation dialog box appears.
|
| 6 |
Tap OK.
Transfer of a photo album starts. |
| 7 |
On your computer, start the PictureGear Studio software.
Click Start, Programs (All Programs on the Windows® XP), PictureGear Studio, then PictureGear Studio. The PictureGear Studio application starts. |
| 8 |
Click PhotoAlbum.
The PhotoAlbum screen appears.
|
| 9 |
Click CLIE button on the tool bar.
Import from CLIE dialog box appears.
|
| 10 |
Select your user name, then click OK.
The Confirmation dialog box appears.
|
| 11 |
Click OK.
The photo album you have chosen in step 4 is transferred to the PictureGear Studio software.
|
Tip
When you transfer a photo album to the PictureGear Studio software, no photo will appear on the cover page of the album.
You can paste a photo on the cover page or change the background of the cover page using the PictureGear Studio software.
You can paste a photo on the cover page or change the background of the cover page using the PictureGear Studio software.
Importing a binder from the PictureGear Studio software
You can import a binder exported to your computer or created using the PictureGear Studio software.
Note
You can only import binders created with the PictureGear Studio software on your computer to the storage media on your CLIÉ™ handheld. You cannot transfer photo albums to your CLIÉ™ handheld.
Transferring page
| 1 |
On your computer, start the PictureGear Studio software.
Click Start, Programs (All Programs on the Windows® XP), PictureGear Studio, then PictureGear Studio.The PictureGear Studio application starts. |
|---|---|
| 2 |
Click Binder.
The Binder screen appears.
|
| 3 |
Click the title which contains the page that you want to transfer from the left column.
|
| 4 |
Click and select the page that you want to transfer.
Press the Shift key and then click to select more than one page.
|
| 5 |
Click CLIE button on the tool bar and select Export Page.
Export to CLIE dialog box appears.
|
| 6 |
Select your user name, then click OK.
When the transfer is complete, click OK on the displayed confirmation screen.
|
| 7 |
On your CLIÉ™ handheld, start the CLIE Album application.
|
| 8 |
On the Album Index screen, tap Menu
The Exchange Data With PC screen appears. , Album, then Exchange Data with PC. , Album, then Exchange Data with PC. |
| 9 |
Tap Import.
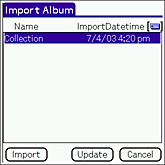
The Import Album screen appears.
Note
Make sure that you have your CLIÉ™ handheld ready for a HotSync® operation.
 Tip
Tap Update to update the list as necessary.
The page you have selected in step 4 and the list of previously selected pages that have not been imported appears. Tap and select the page that you want to import. |
| 10 |
Tap and select the desired page from the list. Then tap Import.
The Confirmation dialog box appears.You can select one page at a time. To select more than one page, select the pages on PictureGear Studio.  |
| 11 |
Tap OK.
The Confirmation dialog box appears.
|
| 12 |
Tap OK.
The transfer of an album through a HotSync® operation starts .
|
Transferring titles
| 1 |
On your computer, start the PictureGear Studio software.
Click Start, Programs (All Programs on the Windows® XP), PictureGear Studio, then PictureGear Studio. The PictureGear Studio application starts. |
|---|---|
| 2 |
Click Binder.
The Binder screen appears.
|
| 3 |
Click the desired title from the left column.
|
| 4 |
Click CLIE button on the tool bar and select Export Title.
Export to CLIE dialog box appears.
|
| 5 |
Select your user name, then click OK.
The transfer of the selected title starts.When the transfer is complete, click OK on the displayed confirmation screen. |
| 6 |
On your CLIÉ™ handheld, start the CLIE Album application.
|
| 7 |
On the Album Index screen, tap Menu
The Exchange Data With PC screen appears. , Album, then Exchange Data with PC. , Album, then Exchange Data with PC. |
| 8 |
Tap Import.
The Import Album screen appears.
Note
Make sure that you have your CLIÉ™ handheld ready for a HotSync® operation.
 Tip
Tap Update to update the list as necessary.
The binder you have selected in step 3 and the list of previously selected binders that have not been imported appears. Tap and select the page that you want to import. |
| 9 |
Tap and select the desired album from the list. Then tap Import.
The Confirmation dialog box appears.You can select one album at a time.  |
| 10 |
Tap OK.
The Confirmation dialog box appears.
|
| 11 |
Tap OK.
The transfer of an album through HotSync® operation starts.
|
Notes on using PictureGear Studio
There are two types of albums used in the CLIE Album application: Photo Album and Binder.
Note that there are some limitations when exchanging data with the PictureGear Studio software.
Note that there are some limitations when exchanging data with the PictureGear Studio software.
| • | Photo Album
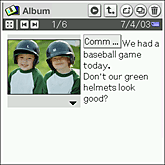
|
||||||
|---|---|---|---|---|---|---|---|
| • | Binder
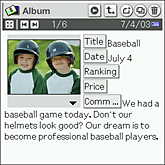
|
Notes
| • |
Any objects or decorations added to the albums using the PictureGear Studio software will not appear on the CLIE Album application.
|
|---|---|
| • |
When you transfer a page(s) in a binder from the PictureGear Studio software, the title of the binder containing the page(s) will be transferred as the album name for use with the CLIE Album application.
|
| • |
When you exchange the same page, the old page will be overwritten.
|
| • |
If your computer enters standby mode during a HotSync® operation to import binders, tap Import and perform the HotSync® operation again.
|