This section describes the basic operation for the CLIE Mail application.
To familiarize yourself, write and send a test e-mail message.
Sending and receiving e-mail
Writing and sending e-mail
Note
You cannot send e-mail directly from your CLIÉ handheld if your CLIÉ handheld is not connected to the network. In such case, you must perform a HotSync operation to transfer e-mail to your computer for sending.
| 1 |
Connect a communication device (sold separately) to your CLIÉ handheld, and prepare your CLIÉ handheld for a network connection.
For details, see “Connecting communication devices”.
|
||||
|---|---|---|---|---|---|
| 2 |
On the CLIE Launcher screen, rotate the Jog Dial navigator to select CLIE Mail, and press the Jog Dial navigator.
Or, tap the CLIE Mail icon on the CLIE Launcher screen.The CLIE Mail application starts and the e-mail list screen appears. |
||||
| 3 |
Tap
The e-mail edit screen appears. |
||||
| 4 |
Enter an e-mail address, a subject, and body text.
You can use the e-mail address you registered in your CLIÉ handheld’s Address Book. For details, see “Looking up an address entry”. |
||||
| 5 |
Tap Send.
A menu appears. |
||||
| 6 |
If you want to send the e-mail immediately, tap Send Now. Otherwise, tap Send Later.
|
Saving an unfinished message
Tap Draft instead of tapping Send.
To view your saved drafts, tap the arrow on the top right corner of the screen, and select Draft.
To view your saved drafts, tap the arrow
 on the top right corner of the screen, and select Draft.
Sending mail later from the Outbox
Tap  or
or  .
.
All e-mail messages stored in the Outbox category are sent at once.
 or
or  .
.All e-mail messages stored in the Outbox category are sent at once.
Selecting an e-mail address from the Address Book
When you tap To, CC, or BCC on the e-mail edit screen, the address screen appears. You can use the address that you have entered in Address Book by tapping Lookup.
For details on the Lookup function, refer to the CLIÉ Handbook.
For details on the Lookup function, refer to the CLIÉ Handbook.
When you cannot send your e-mail
You may not be able to send e-mail messages depending on the setting for your Internet Service Provider server. Follow the steps below to change the server setting to one that is appropriate for your Internet Service Provider.
| 1 |
Tap Menu The Accounts screen appears. , Options, and then Accounts. , Options, and then Accounts.
|
|---|---|
| 2 |
Tap and select an account name indicated (Outgoing).
The selected account name is highlighted.
|
| 3 |
Tap Edit, and then tap More.
The Details screen appears.
|
| 4 |
Tap the arrow
 next to None under SMTP and select SMTP AUTH or POP before SMTP. next to None under SMTP and select SMTP AUTH or POP before SMTP.
|
| 5 |
Tap OK.
Try sending your e-mail again.
|
Receiving e-mail
Download the e-mail you sent in “Writing and sending e-mail”.
Note
If your CLIÉ handheld is not connected to a network, you cannot directly
receive e-mail messages with your CLIÉ handheld but must transfer received e-mail messages from
your computer by a HotSync operation.
| 1 |
Connect a communication device (sold separately) to your CLIÉ handheld, and prepare your CLIÉ handheld for a network connection.
For details, see “Connecting communication devices”.
|
|---|---|
| 2 |
On the CLIE Launcher screen, rotate the Jog Dial navigator to select CLIE Mail, and press the Jog Dial navigator.
Or, tap the CLIE Mail icon on the CLIE Launcher screen.The CLIE Mail application starts. |
| 3 |
Tap
Your CLIÉ handheld connects to the Internet and downloads any new e-mail messages. . .The new e-mail appears on the e-mail list screen. |
| 4 |
Rotate the Jog Dial navigator to select the e-mail message you want to read, and then press the Jog Dial navigator.
You can also read the message by tapping it directly.The message is displayed. |
If the text of the message extends beyond the screen
Rotate the Jog Dial navigator to scroll the screen, or tap the scroll bar.
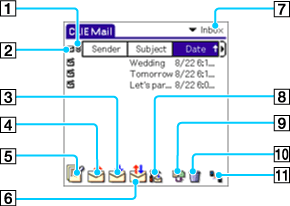
Elements of the CLIE Mail screen

[1] Attachment icon
If a file is attached to an e-mail message, the attachment icon appears to the left of the Sender column.
[2] Read/unread display
This icon indicates whether you have viewed the indicated e-mail message.
[3]  (Receive) button
 (Receive) button
Downloads new e-mail messages.
[4]  (Send) button
 (Send) button
Sends e-mail stored in the Outbox category.
[5]  (New mail) button
Displays the New Mail edit screen.
[6]  (Send and Receive) button
 (Send and Receive) button
Sends e-mail messages stored in the Outbox category and downloads new messages at the same time.
[7] Categories list
Switches the category that is currently displayed on your CLIÉ handheld. To switch the category, tap the arrow  and select the desired category.
 and select the desired category.
[8]  (Receive option settings) button
Specifies how many messages or lines to be received at once. For details, see “Setting advanced e-mail receiving options”.
[9]  (Move) button
Displays the check boxes for selecting the e-mail messages to move. For details, see “Managing e-mail messages using personalized categories”.
[10]  (Delete) button
Displays the check boxes for selecting the e-mail messages to delete. For details, see “Deleting e-mail messages”.
[11]  (Network connection) icon
Displays the online status. You can also switch between online and off-line modes.
| • |
|
|---|---|
| • |
|