If your Home screen is the CLIE Launcher or Palm® OS standard screen, tap the CLIE Organizer icon.
| Scheduling |  |
Viewing the Date Book screen
| 1 |
Tap the Home icon.
|
|---|---|
| 2 |
Tap the Date Book tab.
|
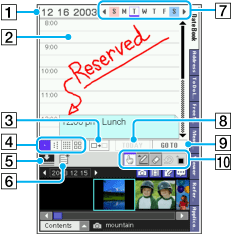 |
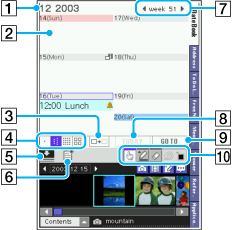 |
| Day view | Week view |
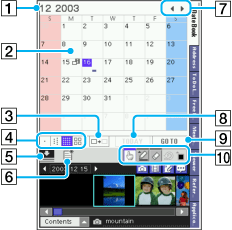 |
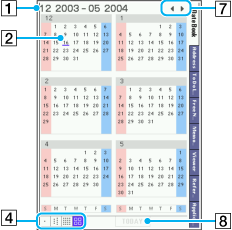 |
| Month view | 6 month calendar |
[1] Month/Day/Year
Displays current date. Tap this area to display the current time.
[2] Event field
Displays your tasks and appointments.
You can paste the Free Notes item or sticker.
The Day field displays the following:
| • |
|
||
|---|---|---|---|
| • |
Holiday |
||
| • |
Note
When the Graffiti 2 or Decuma field is shown, tap
|
||
| • |
|
||
| • |
|
Note
You can handwrite data, attach the content such as a note, and paste the sticker. For details on handwriting, see “Handwriting on Date Book”.
[3] Show/hide Free Notes button
Tap this icon to hide the handwritten data or contents.
[4] Icons to change the Date Book view
Tap one of the following icons to show the corresponding calendar view:
[5] Show/hide contents icon
Tap  to hide the contents field.
Tap  to show the contents field.
You can list the contents including photos and stickers or display the To Do item.
You can drag and drop the contents including photos or stickers on the Day view, Week view, and Month view.
[6] New
[7] Change view
Tap the scroll arrow to go to the next or previous day.
On the Day field, you can tap the day of the week to display the appointments on the current week.
[8] TODAY
Tap this area to display the current date.
[9] GO TO button
Displays The Go To Date screen. When you tap the date on the calendar, you can check your event.
[10] Handwriting toolbar
| • |
|
|---|---|
| • |
|
| • |
|
| • |
|
| • |
|
Details
When the Contents field is hidden, the Details field is shown on the Week and Month views.
The event on the Details field includes: Start time*, end time*, icon, title,  (Free Note Link icon),
  (Note icon),
  (Alarm icon), and
  (Recurrence icon)
| * |
Cannot be displayed according to the settings. For details on the settings, see Day View Prefs in "Options menu". Note
The end time is only displayed when the font is small or smallBold.
|
|---|
| • |
|
|---|---|
| • |
|
Scheduling an event
You can easily schedule an event, for example, from 1:00 pm to 2:00 pm.
When you schedule an event listed below, It is a good idea to enter an appropriate field and then edit the correct time.
| • |
Event that starts at quarter or half minutes, such as 1:15 pm. |
|---|---|
| • |
Event that cannot specified by the hour |
| • |
Event when the precise time is not specified. |
| • |
Regular event: for details, see “Scheduling recurring or continuous events”. |
Note
You cannot specify the time after 11:59 pm.
| 1 |
Tap the Home icon.
If your Home screen is the CLIE Launcher or Palm® OS standard screen, tap the CLIE Organizer icon.
|
||||
|---|---|---|---|---|---|
| 2 |
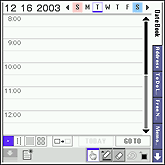
Tap the Date Book tab.
Or, press
 |
||||
| 3 |
Schedule the date in one of the following:
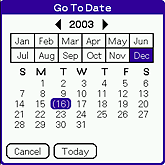 |
||||
| 4 |
On the Day view, tap the start time.
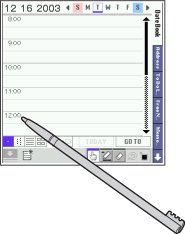 When you tap the New icon and the Event Details dialog box is displayed, one hour event is created starting from the time you tapped.
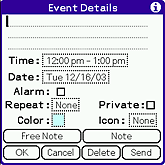 Tap
|
||||
| 5 |
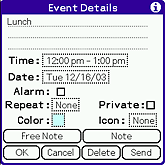
Enter the scheduled contents.
You can enter a maximum of 255 characters.
If your event is just an hour, this concludes your scheduling. Tap OK.
 |
||||
| 6 |
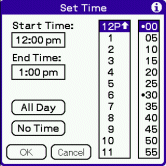
If your event is not an hour, tap Time.
The Set Time dialog box is displayed.
|
||||
| 7 |
Tap the Start Time box and tap the start time from the time list to the right of the dialog box.
|
||||
| 8 |
Tap the End Time box and tap the end time from the time list to the right of the dialog box.
|
||||
| 9 |
Tap OK.
|
||||
| 10 |
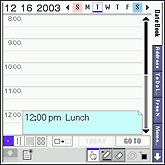
Tap OK.
 |
Deleting events
You can delete existing events in Date Book.
Note
If you delete the contents of a recurring event, all the related events will be deleted. When deleting an event in the Delete Event dialog box, you can delete a single event as an exception or all the related events.
| 1 |
On the Date Book screen, tap the event you want to delete.
The Event Details dialog box is displayed.
|
|---|---|
| 2 |
Tap Delete.
The Delete Event dialog box is displayed.
|
| 3 |
Tap OK to delete the event.
|
If you select the “Save archive copy on PC” check box, the deleted event will be saved to the CLIE Organizer for PC software on your computer during the next HotSync® operation.
Deleting the finished events
By specifying the term from the current date on your CLIÉ™ handheld, you can delete the events older than the specified date. It is useful to save memory on your CLIÉ™ handheld.
| 1 |
On the Date Book screen, tap
The Purge dialog box is displayed.
|
|---|---|
| 2 |
Tap
For example, the events older than one week are deleted.
|
| 3 |
Tap OK.
If you tap the check box for "Save archive copy on PC", the deleted event will be saved to the CLIE Organizer for PC software on your computer during the next HotSync® operation. To view the saved data, start CLIE Organizer for PC on your computer. Choose File, then Open Archive.
|
Note
Even if you choose Purge, you cannot delete regular events.
Handwriting on Date Book
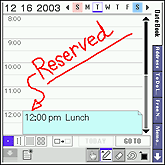
You can draw a note or line on the Day view, Week view, and Month view.
| 1 |
On Date Book, tap the day where you want to draw.
|
|---|---|
| 2 |
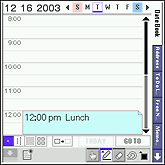
Tap
You can draw on Date Book.
 |
| 3 |
Tap the icon that you want to use.
|
| • |
|
|---|---|
| • |
|
| • |
|
| • |
 |
| 4 |
Tap
The mode returns to the standard input mode.
|
Deleting the handwritten note
You can delete all the handwritten note currently displayed on the Event field.
| 1 |
On Event field, tap
The Delete Handwritten data dialog box is displayed.
|
|---|---|
| 2 |
Tap Yes.
|
Pasting the content including still images
You can paste the content including still images on the Day view, Week view, and Month view.
| 1 |
On Date Book, tap the day where you want to paste the content.
|
||||||||
|---|---|---|---|---|---|---|---|---|---|
| 2 |
Tap
The contents area is displayed.
If the contents area is not shown, tap
|
||||||||
| 3 |
Tap the Filter button at the left of the contents area to select the file that you want to display.
When the button is blue, the file is shown. When the button is grayed out, the file is hidden.
To show all the files, select all the buttons.
|
||||||||
| 4 |
Drag and drop the content on the Date Book screen.
The content is pasted on Date Book .
During drag and drop, the content becomes transparent in order to easily paste it.
|
Pasting the sticker
You can paste the sticker on the Day view, Week view, and Month view.
| 1 |
On Date Book, tap the day where you want to paste the sticker.
|
||||||
|---|---|---|---|---|---|---|---|
| 2 |
Tap
The contents area is displayed.
If the contents area is not shown, tap
|
||||||
| 3 |
Tap
The stickers are listed on the Contents field.
|
||||||
| 4 |
Drag and drop the sticker to the Free Notes screen.
The sticker is pasted.
|